Tuesday, January 4, 2022

Flowing Fix: Controlling multiple computers with one keyboard and mouse

 Barrier

A virtual KVM switch, allowing for local network control of multiple computers (running either MS Windows, macOS, or Linux) using a single keyboard and mouse. Barrier is a fork of  the Synergy 1.9 codebase (more info on Barrier: https://github.com/debauchee/barrier)

Download link: https://github.com/debauchee/barrier/tags


Note: a common issue is not creating an SSL cert on Windows (via  https://github.com/debauchee/barrier/issues/231)

First, install openssl (either with Git https://git-scm.com/  or standalone https://www.openssl.org/ ), then:

cd %LOCALAPPDATA%\Barrier\SSL

mkdir Fingerprints

openssl req -x509 -nodes -days 365 -subj /CN=Barrier -newkey rsa:4096 -keyout Barrier.pem -out Barrier.pem

openssl x509 -fingerprint -sha1 -noout -in Barrier.pem > Fingerprints\Local.txt

If you use WSL, I recommend you to do it from there, replacing %LOCALAPPDATA% with your Windows path.

If you use WSL, I recommend you to do it from there, replacing %LOCALAPPDATA% with your Windows path.


Thursday, December 24, 2020

Flowing Fix: Including Computations in LaTeX

Below are two options for embedding coding into LaTeX files that can be executed and update values in the LaTeX file.


Tuesday, October 1, 2019

Monday, September 23, 2019

KMLCSV Converter

Useful application to convert CSV to KML files and KML to CSV files:

The KMLCSV Converter is available for macOS, Windows, and Linux
https://choonchernlim.com/kmlcsv/

Wednesday, September 11, 2019

Flowing Fix: Create Application Shortcut in Chrome

1) Select the "Customize and control Chrome Chrome" button at the upper-right of the Chrome window (denoted by three vertical dots).

2) Select "More Tools"

3) Select "Create shortcut"

Figure denoting the first 3 steps to Create Shortcut in Chrome
4) Edit the "Shortcut name"

5) Check "Open as window"

6) Press "Create" button (a new window should open and an associated icon should appear in either the MS Windows taskbar or the Dock on the macOS)

7) Right-click on that icon (on the Taskbar or Dock) and
     - on MS Windows, select "Pin to taskbar"
     - on macOS, select "Options" >> "Keep in Dock"


Reference:
https://www.sorendam.com/create-application-shortcut-chrome-mac/

Friday, September 6, 2019

Flowing Fix: Use Spotlight to locate file location

To use Spotlight to locate the location of a file on the Mac, do the following:

1) Open Spotlight, either by one of the following:
     - press CMD+Spacebar 
        or 
      - click the "magnifying glass" in the upper right of the screen

2) Type in the file name (or part of the name) that you are looking for

3) Click on the item in the spotlight list 

4) Press CMD   (at this point you should see a path box appear)

5) If you press CMD+Enter when an item is selected, a new Finder window will open showing the selected file in the folder location.

Monday, August 19, 2019

Flowing Fix: Quickly share a large file via your browser

At some point in time, you might find you need to transfer a large file. There are numerous file-sharing services (Dropbox, Google Drive, Box.com, Amazon Drive, etc.) however if you need to quickly send a file without uploading it to a central server first, File Pizza delivers.

File Pizza is a peer-to-peer file transfer via browser (nothing needs to be installed and it just works), the only caveat is since the transfer is directly between sender and receiver (no middle server for the file to be uploaded to), both sender and receiver need to be online at the same time. It is very convenient for one-off file shares, not for a persistent link that people can download at any time.

File Pizza (your files delivered)
https://file.pizza/


More details via the https://github.com/kern/filepizza website:
"Using WebRTC, FilePizza eliminates the initial upload step required by other web-based file sharing services. When senders initialize a transfer, they receive a "tempalink" they can distribute to recipients. Upon visiting this link, recipients' browsers connect directly to the sender’s browser and may begin downloading the selected file. Because data is never stored in an intermediary server, the transfer is fast, private, and secure."

Monday, August 12, 2019

Flowing Fix: Installing garamondx font (and other non free fonts) on Mac

To install the Garamondx font on TexLive distribution for Mac (not include in TexLive utility) do the following:

1) download the getnonfreefonts script from https://tug.org/fonts/getnonfreefonts/install-getnonfreefonts  and save it to an arbitrary folder on the desktop

2) Open terminal and cd into the folder where you saved the getnonfreefonts script

3) run the script via terminal line by entering:  sudo texlua install-getnonfreefonts

4) check the install by typing:  getnonfreefonts --help

5) check the status of fonts on the system by typing:  getnonfreefonts -l

6) install garamondx font by typing:  getnonfreefonts garamondx

7) check install status by typing: getnonfreefonts -l

Monday, August 5, 2019

Flowing Fix: How do I get those data points off an image? [revisited]


A while back, we posted how to get data off an image by running digitizing software on your local system (see the link to the prior post below). However, if you have limited admin access to install/run the software (or don't want to install software), WebPlotDigitizer is a web-based tool that runs directly your web browser https://automeris.io/WebPlotDigitizer/ that allows you to extract data from plots, images, and maps


Monday, July 15, 2019

Computing the optimal road trips

If you have a trip will multiple stops and you are having trouble finding an optimal route here are some links to help you.

Optimizing routes (web interactivity):
1) MapQuest [26 locations]: https://www.mapquest.com/routeplanner
2) RouteXL[20 locations for free]: https://www.routexl.com/


For the more adventurous (coding required):
Genetic Algorithm approach:
from Randal Olson' blog which uses Python with Google Maps:
http://www.randalolson.com/2016/07/30/the-optimal-u-s-national-parks-centennial-road-trip/

Using Gurobi solver: 
from Nathan Brixius's blog which uses Python

Using Concorde solver, the world’s best Traveling Salesman Problem (TSP) solver:
from Nathan Brixius's blog which uses Python

Monday, July 8, 2019

Flowing Fix: Mathpix Snipping Tool

There are times when you need to replicate an equation or block of text from a PDF file. If the PDF file was converted from a typed file, chances are that the text in the PDF can be selected. However, for equations (and if the PDF is image-based), you were out of luck, until now. Mathpix Snipping Tool is perfect for capturing a screenshot of the equation or text and automatically converts it to LaTeX. It is almost magical, capable of converting typed and handwritten information to LaTeX.
Download Mathpix Snipping Tool for MS Windows, macOS, and Ubuntu from https://mathpix.com/

Sunday, January 20, 2019

Flowing Fix: Getting file paths on macOS Mojave

Prerequisite:
The Path Bar needs to be enabled.
To enable, in the Finder menubar at the top left, click the following:
Finder >> View >> Show Path Bar


1) Once the Path Bar is enabled, right-click on a folder item in the Path Bar and select "copy xxxx as Pathname" where xxxx is the item selected in the Path Bar


Reference:

Monday, July 4, 2016

Thursday, June 30, 2016

Flowing Fix: Embedding math equations and symbols in Inkscape

You can embed equations and math symbols using LaTeX. In Inkscape versions 0.48(and above) this option was introduced through the top menu: Extensions  >> Render >> LaTeX

However, before you can see the LaTeX option in the Render menu on MS Windows machines, you have to have the following installed:

  1.  Install LaTeX: MikTeX  http://miktex.org/ (for Windows)
  2. Ghostscript: http://ghostscript.com/download
  3. Install pstoedit (with the SVG plugin):  https://sourceforge.net/projects/pstoedit/
  4. Then update "path environmental variables" to include the pstoedit folder (e.g., C:\Program Files\pstoedit) OR move the pstoedit folder to C:\Program Files\Inkscape
via
http://wiki.inkscape.org/wiki/index.php/LaTeX
http://tex.stackexchange.com/questions/257147/how-to-use-latex-with-inkscape-mac-os-x


Another option to easily add Greek letters within Inkscape using Unicode
html version: http://www.physics.nmt.edu/~raymond/software/howtos/greekscape.xhtml
pdf version: http://www.physics.nmt.edu/~raymond/software/howtos/greekscape.pdf


------- More about Inkscape below------------

Inkscape (http://www.inkscape.org) is a free and open source professional vector graphics editor for MS Windows, Mac OS X and Linux.

For tutorials on Inkscape:
http://inkscape.org/en/learn/tutorials/
http://pigux.com/deviant/source/tutorials/InkscapeTutorial.pdf

Other learning resources:
 http://inkscape.org/en/learn/

Monday, June 27, 2016

Why pursue a PhD?

We often get a lot of questions regarding the PhD degree, and why someone would pursue one.  Here are some link that we thought would be very beneficial:

Why pursue a PhD: http://flowingdata.com/2014/10/07/why-to-pursue-a-phd

The illustrated guide to a Ph.D.: http://matt.might.net/articles/phd-school-in-pictures


Thursday, June 23, 2016

Flowing Fix: Biber fails with error missing "recode_xdata.xml"

In short, the cache files are corrupted and need to be removed. Delete the cache folder with the files and compile the document again.

You can find the cache folder path by looking in .blg file or by using the command:  biber --cache

For more information see instructions at the following link:
http://tex.stackexchange.com/questions/140814/biblatex-biber-fails-with-a-strange-error-about-missing-recode-data-xml-file

Monday, September 8, 2014

Flowing Fix: View RAW images natively in Windows

Mac users have the ability to view RAW images natively in OS X.  However, Windows users can have the same ability by installing the  Microsoft Camera Codec Pack (http://www.microsoft.com/en-us/download/details.aspx?id=26829)

For more details on viewing and editing RAW images natively in Windows see this article:
http://www.techradar.com/us/news/photography-video-capture/cameras/how-to-view-and-edit-raw-natively-in-windows-984141

Monday, January 27, 2014

CUDA over Remote Desktop

On Windows, it is not possible to use CUDA over Remote Desktop on the primary video card.  If you have more than one graphics card that is CUDA capable, you can execute the following command to set the driver mode of the secondary card as TCC (Tesla Compute Cluster) mode.  For example, open a command prompt as an administrator, then:

cd C:\Program Files\NVIDIA Corporation\NVSMI
nvidia-smi -i 1 -dm 0

Where -i 1 should be the index of the card (0 is primary).  -dm 0 sets the mode to be TCC.

See http://stackoverflow.com/q/12304082/724351.

Friday, October 25, 2013

Flowing Fix: Interpolation in MS Excel using XonGrid Interpolation AddIn

MS Excel is a very useful software program and it has many built in functions. We often hear, " How do I interpolate in Excel, where is the interpolation function?"  As many functions as Excel has, it still lacks a simple function to perform quick interpolations. Yet, it should be stated that it is possible to pair up functions (e.g., using forecast, offset, and match functions) to basically performance the interpolation as illustrated here:
http://www.blueleafsoftware.com/Products/Dagra/LinearInterpolationExcel.php

However, this method is not as intuitive as having a simple build in function. There is an XLL file that you can add-in to Excel entitled XlXtrFun ( http://www.xlxtrfun.com/XlXtrFun/XlXtrFun.htm ), however it is not compatible with Excel 2007 or higher versions. Furthermore, at the time of this post it is not possible to download the zipped file from the above website, which makes XlXtrFun a non-viable option.

Which brings us to the motivation for this post:

XonGrid Interpolation AddIn (http://xongrid.sourceforge.net/) is a freely available add-in for Excel which works for both the 32 and 64 bit versions of Excel and is also compatible with the older and newer versions of Excel (e.g., Excel 2003, 2007, 2013) unlike XlXtrFun. While XlXtrFun has many more functions than XonGrid, if you are looking for Excel interpolation add-in functions, XonGrid is perfect for you.

As a nice bonus to improve computations if you are doing many simulations interpolations of the same basic dataset, the XonGrid interpolation functions can be used as part of array functions, as mentioned in http://office.microsoft.com/en-us/excel-help/introducing-array-formulas-in-excel-HA001087290.aspx. Instead of using the sum function mentioned in the above article, you can use the interp1d function as part of the XonGrid package. Be sure to fix the data range with the $ characters, so that when the array function is populated  in each cell, the data range is not changed, only the xo value change which will corresponded to the desired yo value that you find.

Preventing the Java Updater from including the Ask Toolbar in the installer

The Java Updater has an annoying habit of prompting the user to install the Ask.com Toolbar. This unwanted behavior occurs every time a Java update is released. We found a solution to this that involves modifying the registry, and wrote this small application that does the registry modification for the user. To use it, right-click on the program and select Run as Administrator. Please send any questions to noberg at illinois dot edu. Download link: EXE or ZIP [16 KB]. The source code (Visual Studio 2010, C# project) is also available as a ZIP.

Friday, June 21, 2013

Flowing Fix: Show Hidden Files on your Computer

Some times you really need to access special data files which operating systems typical hide.  Here is how you go about unhiding those files.  Warning: this files are hidden for a reason, so please take care with manipulating the files.

Mac OSX
Option 1: via Terminal command line
To enable hidden files/folders in finder windows:
1) Open Finder
2) Open the Utilities folder
3) Open a terminal window
4) Copy and paste the following line in:
defaults write com.apple.Finder AppleShowAllFiles YES
5) Press return
6) Now hold ‘alt-option’ on the keyboard and right click on the Finder icon
7) Click on Relaunch
After Finder relaunches you should be able to see the any hidden files or
folders (which will appear as lighter icons compared to normal file icons).
8) After completing the you task with the hidden files, it is best to re-hide the files.  Follow the same steps (1-7) above but this time replace step 4 terminal command with the following:
defaults write com.apple.Finder AppleShowAllFiles NO

Option 2: via free software
If you do not like the terminal method, you can use this free software: hideswitch, from http://www.creativecag.com/software


MS Windows 7
1) Control Panel
2) In search window type, Folder Options and select it
3) Click the View tab
4) Under advanced settings, click the Option button to "Show hidden files, folders, or drives"
5) [optional], it is recommended to UNCHECK the option to "Hide extensions for known file types"

Friday, April 19, 2013

Flowing Fix: Simple search to find the large attachments in Gmail


Is your gmail account getting full?  Easily search for large messages which are filling up your account.
To search for attachements greater than 25MB, in the Gmail search box enter:   size:25000000
other examples:


Friday, March 15, 2013

Flowing Fix: How to quickly mirror your data to a second hard drive

Robust File Copy (or Robocopy)  is a command-line command to replicate directories. It is a standard feature in Windows since Windows Vista and Windows Server 2008.

To help us use  the "robocopy" command more readily we create simple batch files

1) In Windows, open Notepad and enter the following information into the new text file:


set log=C:\tmp\LogName.log
set opts=/NP /XJ /R:0 /COPY:DAT /E /LOG+:%log% /TEE
del /F /Q %log%
robocopy "C:\yourSourceFolder" "F:\yourDestinationFolder" %opts%


Note: "C:\yourSourceFolder"  and "F:\yourDestinationFolder" should be replaced with your source and destination folders. 

2) Then, save this text file and change the extension to ".bat" to create a DOS batch file.

3) To run, just double click on the .bat file

About the batch file you just created:
First line: defines the name and location to store the log file.
Second line: sets the options required to mirror the data 
     /NP -  turns off the progress of copying of the copying operation
     /XJ  -  excludes junction points (important for user folders on Windows 7, etc.)
     /R:0  -  sets the retries for failed copies to zero
     /COPY:DAT  -  Specifies the file properties to be copied, DAT is Data, Attributes, and Time stamps
     /E  -  Copies subdirectories (including empty directories)
     /LOG+:  -  Writes the status output to the log file (appends the output to the existing log file)
     /TEE  -  Writes the status output to the console window, as well as to the log file.
Third line: deletes the log file before running.
Fourth line: executes "robocopy" to copy the data from "C:\yourSourceFolder" to "F:\yourDestinationFolder" using the options provide on line two of the batch file.

For more information about robocopy and list of options refer to http://technet.microsoft.com/en-us/library/cc733145(v=ws.10).aspx


Tuesday, December 18, 2012

Help! My Access Database Is Locked!

When a Microsoft Access database is opened, the database engine (known as the JET engine) creates a lock file aka the LDB file.  These LDB files are a known format and contain information about who has opened the database.  This can be useful in certain situations.

Let's say that you use ArcGIS, which can use Access databases for the backend.  You opened the database using ArcGIS and you want to make some changes to the schema.  But ArcGIS won't let you because the schema is locked.  Help!  What can you do?  Enter the LDB File Viewer program.  Simply open the program, drag a LDB file onto the programs window, and it will tell you which computer has the database locked.

Get it!

For completeness sake, the source code is in C# and is as follows:

using System;
using System.Collections.Generic;
using System.ComponentModel;
using System.Data;
using System.Drawing;
using System.Text;
using System.Windows.Forms;
using System.IO;

namespace AccessLockFileViewer
{
  public partial class AccessLockFileViewer : Form
  {
    public AccessLockFileViewer(string[] files)
    {
      InitializeComponent();
      if (files != null && files.Length > 0)
      {
        this.textBox1.Text = ParseFile(files[0]);
      }
    }

    private void Form1_DragDrop(object sender, DragEventArgs e)
    {
      if (e.Data.GetDataPresent(DataFormats.FileDrop))
      {
        string[] files = (string[])(e.Data.GetData(DataFormats.FileDrop));
        foreach (var file in files)
        {
          string text = ParseFile(file);
          this.textBox1.Text += text;
        }
      }
    }

    string ParseFile(string file)
    {
      /*
       *  For each person who opens a shared database, the Jet database engine writes an
       *  entry in the .ldb file of the database. The size of each .ldb entry is 64 bytes.
       *  The first 32 bytes contain the computer name (such as JohnDoe). The second
       *  32 bytes contain the security name (such as Admin). The maximum number of
       *  concurrent users that the Jet database engine supports is 255. Therefore, the
       *  .ldb file size is never larger than 16 kilobytes.
       */
      using (var stream = new FileStream(file, FileMode.Open))
      {
        BinaryReader reader = new BinaryReader(stream);
        string text = "";
        for (int i = 0; i < reader.BaseStream.Length; i += 64)
        {
          byte[] bin = reader.ReadBytes(32);
          StringBuilder sb = new StringBuilder();
          for (int b = 0; b < 32; b++)
          {
            if (bin[b] == 0)
            {
              break;
            }
            sb.Append((char)bin[b]);
          }
          string user = sb.ToString();


          bin = reader.ReadBytes(32);
          sb = new StringBuilder();
          for (int b = 0; b < 32; b++)
          {
            if (bin[b] == 0)
            {
              break;
            }
            sb.Append((char)bin[b]);
          }
          text += sb.ToString() + "@" + user + "\r\n";
        }
        stream.Close();

        return text;
      }
    }

    private void Form1_DragEnter(object sender, DragEventArgs e)
    {
      if (e.Data.GetDataPresent(DataFormats.FileDrop))
      {
        e.Effect = DragDropEffects.Copy;
      }
      else
      {
        e.Effect = DragDropEffects.None;
      }
    }

    #region Windows Forms Code

    /// 
    /// Required designer variable.
    /// 
    private System.ComponentModel.IContainer components = null;

    /// 
    /// Clean up any resources being used.
    /// 
    /// true if managed resources should be disposed; otherwise, false.
    protected override void Dispose(bool disposing)
    {
      if (disposing && (components != null))
      {
        components.Dispose();
      }
      base.Dispose(disposing);
    }

    #region Windows Form Designer generated code

    /// 
    /// Required method for Designer support - do not modify
    /// the contents of this method with the code editor.
    /// 
    private void InitializeComponent()
    {
      this.textBox1 = new System.Windows.Forms.TextBox();
      this.SuspendLayout();
      // 
      // textBox1
      // 
      this.textBox1.Location = new System.Drawing.Point(13, 13);
      this.textBox1.Multiline = true;
      this.textBox1.Name = "textBox1";
      this.textBox1.ReadOnly = true;
      this.textBox1.Size = new System.Drawing.Size(290, 202);
      this.textBox1.TabIndex = 0;
      // 
      // AccessLockFileViewer
      // 
      this.AllowDrop = true;
      this.AutoScaleDimensions = new System.Drawing.SizeF(6F, 13F);
      this.AutoScaleMode = System.Windows.Forms.AutoScaleMode.Font;
      this.ClientSize = new System.Drawing.Size(317, 230);
      this.Controls.Add(this.textBox1);
      this.Name = "AccessLockFileViewer";
      this.Text = "LDB File Viewer";
      this.DragDrop += new System.Windows.Forms.DragEventHandler(this.Form1_DragDrop);
      this.DragEnter += new System.Windows.Forms.DragEventHandler(this.Form1_DragEnter);
      this.ResumeLayout(false);
      this.PerformLayout();

    }

    #endregion

    private System.Windows.Forms.TextBox textBox1;

    #endregion

  }

  static class Program
  {
    /// 
    /// The main entry point for the application.
    /// 
    [STAThread]
    static void Main(string[] args)
    {
      Application.EnableVisualStyles();
      Application.SetCompatibleTextRenderingDefault(false);
      Application.Run(new AccessLockFileViewer(args));
    }
  }
}

Wednesday, December 12, 2012

Flowing Fix: Accessing the Library folder on Mac OS 10.7+

On Mac OS X (10.7) the "Library" folder is no longer in the dropdown list of the "Go" menu in Finder.  To enable view the "Library" folder in the list:
hold down the Alt key while view at the dropdown listing in the "Go" menu, the folder should appear in the list.

for more information refer to
http://hints.macworld.com/article.php?story=20111103174815203

Tuesday, December 4, 2012

Flowing Fix: Web based services to help schedule meetings and resources

Doodle (web based)   http://doodle.com/:
Web based scheduling service that lets you ( and others) easily schedule appointments.  Integrates with existing digital calendars ( iCal, Outlook, Google, etc.) and allows users to select best times for meetings.

WhenIsGood (web based) http://whenisgood.net/ :
Another option for quick determining what meeting time is good for everyone.

YouCanBook.Me (web based) http://youcanbook.me/ :
Free version of the service allows you to link to one of your calendars (e.g., a Google Calendar) and allows users to schedule resources.  The service has numerous ways to customize the interface as well as auto-responses reminders to those that signed up and the host.  We use it to allow student to reserve survey equipment during the semester. It works wonderfully.

(all of the above site are Freemium based, i.e., the services are provided free of charge, but a premium is charged for the more advanced features)


Wednesday, November 21, 2012

HHWQ: HYDROLOGICS, HYDRAULICS, AND WATER QUALITY: MODELING AND SIMULATION

HHWQ
Hydrologics, Hydraulics, and Water Quality: Modeling and Simulation http://hhwq.blogspot.com/ A nice blog that has quite a growing collection of links to various hydrologic, hydraulic, and water quality models

Wednesday, November 7, 2012

Flowing Fix: Repair and Rebuild the iPhoto Library

If iPhoto has been acting up on you, you might need to rebuild the library.  To get to the the rebuild menu, press and hold the Command and Option keys when clicking the iPhoto icon to launch the application.

For more details of which options to select, refer to this website:
http://cybernetnews.com/repair-restore-rebuild-iphoto-library/

Generate LaTeX tables from CSV files (Excel)

via: http://texblog.org/2012/05/30/generate-latex-tables-from-csv-files-excel/
Generate LaTeX tables from CSV files (Excel):
Besides various online services and scripts, there are several LaTeX packages that generate tables directly from CSV (comma separated value) files. The advantage is everything is in the tex-file in one place and one doesn’t have to switch back and forth between website/script and LaTeX when changes are made. The drawback clearly is their limited flexibility or high complexity for sophisticated tables.
Note, I used the following few lines of code to generate a simple CSV file using LaTeX. All examples assume the existence of the file “scientists.csv”. Just copy the code into a tex-file and typeset.
\documentclass{minimal}
\begin{filecontents*}{scientists.csv}
name,surname,age
Albert,Einstein,133
Marie,Curie,145
Thomas,Edison,165
\end{filecontents*}
The star suppresses additional information on the file creation from being added.
Let’s start with a simple package.


Package csvsimple
Here is a very basic example. Elements of the first row are considered column titles. To separate them from the table content, a horizontal line is automatically added in between.
\documentclass{article}
\usepackage{csvsimple}
\begin{document}
\csvautotabular{scientists.csv}
\end{document}

The command csvreader provides a better control of the column style, titles and content, but makes things slightly more complicated.
Here is an example:
\documentclass{article}
\usepackage{csvsimple}
\begin{document}
\csvreader[tabular=|l|l|c|,
 table head=\hline & Name & Age\\\hline,
 late after line=\\\hline]%
{scientists.csv}{name=\name,surname=\surename,age=\age}%
{\thecsvrow & \firstname~\name & \age}%
\end{document}

The first part of the optional argument controls the alignment of the content per column (tabular). The second sets the column titles and adds a horizontal line before and after them (table head). Finally, another horizontal line is added to the end of the table (late after line). Furthermore, “commands” are defined for every column using the column title from the CSV file (name, surname and age). These commands allow reordering and combining column content. The command thecsvrow is a row counter and therefore an easy way to enumerate the rows.
Here is the complete package documentation.


Package pgfplotstable
A more flexible package is pgfplotstable (package documentation). It allows generating tables from different data files types. However, we will only consider CSV files here.
Again, an optional argument serves to customize what the table looks like, using key-value-pairs. Here is a minimal example with the file generated earlier. A simple example without anything special is quite complicated:
\documentclass{article}
\usepackage{pgfplotstable}
\begin{document}
\pgfplotstabletypeset[
 col sep=comma,
 string type,
 columns/name/.style={column name=Name, column type={|l}},
 columns/surname/.style={column name=Surname, column type={|l}},
 columns/age/.style={column name=Age, column type={|c|}},
 every head row/.style={before row=\hline,after row=\hline},
 every last row/.style={after row=\hline},
 ]{scientists.csv}
\end{document}

One of the things that makes this package interesting is, it supports multicolumn.
\documentclass{article}
\usepackage{pgfplotstable}
\begin{document}
\pgfplotstabletypeset[
 col sep=comma,
 string type,
 every head row/.style={%
  before row={\hline
   \multicolumn{2}{c}{Full Name} & \\
  },
  after row=\hline
 },
 every last row/.style={after row=\hline},
 columns/name/.style={column name=Name, column type=l},
 columns/surname/.style={column name=Surname, column type=l},
 columns/age/.style={column name=Age, column type=c},
 ]{scientists.csv}
\end{document}

Furthermore, the package allows generation of multi-page tables with longtable (package documentation) with pgfplotstable (see the package documentation for more details).


The csvsimple as well as the pgfplotstable package documentations are both comprehensive and very nicely formatted. It seems, the authors put in quite a bit of effort writing them. Check it out!


Further packages and other approaches
Other packages that I will not discuss here include:

Wednesday, October 31, 2012

Flowing Fix: Clear your printer queue on Mac OS X

via: http://forums.techguy.org/apple-mac/1062988-solved-canon-ip6700d-printer-wont.html#

If you are having trouble deleted a file from your printer queue, you might have to resort to a terminal line command.

1) Open up "terminal" by searching for it with Spotlight or going to "/Applications/Utilities/Terminal"
2) then, at the prompt type the following:
    lprm -
3) This should remove it from the queue.  If not, you can reset the print system.

If step 2 above did not work: To reset the print system, go to the printer system preference dialog, right click your printer and choose reset print system. After which you will have to re-add your printer.

Wednesday, October 24, 2012

Batch operations on images: IrfanView

Previously I covered batch operations from the command line.  IrfanView is a small and fast program for viewing images, but it also has a batch conversion tool that can convert between image types (e.g. TIFF to JPG):


In it's advanced mode, it can crop, resize, and do many other operations:


Get it here: http://www.irfanview.com/.  You'll also want to download the plugins installer to get access to more file types.

Wednesday, October 17, 2012

Batch operations on images: ImageMagick

Having to do the same operation on multiple images sometimes lends itself to batch processing.  There are several tools for doing this.  I'll briefly introduce you to one tool: ImageMagick.  ImageMagick is suite of command-line programs that allow you to resize, crop, convert, and do many other useful things.

To use ImageMagick, download and install the program.  (Note that during the installation you will need to add the tools to the path.)  If you want to do operations on PDF, postscript or EPS files, you will also need Ghostscript.  Open a command prompt in Windows.

I'll demonstrate how to create thumbnails from the first page of a PDF file:
convert -thumbnail x100 "File.pdf[0]" File.thumb.png
This creates a thumbnail File.thumb.png from the first page of the file File.pdf[0] instructs convert to use the first page.  If you leave off the [0] part thumbnails will be created for every page in the PDF.  The thumbnail height is 100 pixels, and the width is automatically determined.

If you want to automate this, you can use command line batch processing, MATLAB, or my favorite scripting language, Perl:
foreach my $file (glob("$ARGV[0]/*.pdf"))
{
   print "Converting $file\n";
   print `convert -thumbnail 133x100 "${file}[0]" ${file}.png`;
}

Wednesday, October 10, 2012

Linux Live CD for increased banking security

Many people don't realize how easy it is for criminals to siphon money from your bank account.  The basic procedure is 1) install a virus on a target computer, 2) virus grabs passwords and/or credit card numbers from the target computer, 3) send stolen information to criminal hacker, and 4) money is used to purchase items or to transfer out of the country via money mule.  The RSA security firm has discovered that criminal gangs are working in concert to attack U.S. banksSophisticated techniques can be used to ensure that the criminals receive the money.  Many times it can be impossible to detect that you have one of these money-stealing viruses.

Enter Linux Live CDs.

In order to ensure that your banking information is safe, you can use a Linux Live CD to temporarily boot into Linux, use a web browser to perform online transactions, and then boot back into Windows.  If your Windows computer has password-stealing malware on it, that malware will have no knowledge of your banking transactions.

The U.S. Air Force has developed a Live CD directly for this purpose: Lightweight Portable Security (LPS) that can also be installed on a USB flash drive.  This particular Live CD has a GUI that looks similar to the Windows interface, making it familiar and easy to use.

If LPS doesn't work for you, try Puppy Linux or Ubuntu.  Many more are available to choose from, too; see http://www.livecdlist.com/.

Wednesday, September 26, 2012

Flowing Fix: How to make a bootable Mountain Lion install drive and use the media once created

For various reason you might want to have a copy of the Mac OS software, here is how to do it and use the media that you created

This can be done using two different media formats:

  • USB flash drive or other removable media
  • Dual-layer DVD (note that single-layer disk is too small for Mountain Lion, but was okay for Lion)

The instructions for each one of the media types is as follows (common instruction):

1. Download Mountain Lion from the Mac App Store
(NOTE: if you have already downloaded and installed Mountain Lion on your Mac you will have to re-download the software, using the  "Option" button and click on the app in the Mac App store.  Follow the detailed information at this website: http://macs.about.com/od/usingyourmac/qt/How-To-Re-Download-Apps-From-The-Mac-App-Store.htm )


USB flash drive or other removable media option:

Using Disk Utility You’ll find this utility in your Utilities folder (in /Applications/Utilities). Here are the steps for using it to create your installer drive:

.
  1. Once you’ve purchased Mountain Lion, find the installer on your Mac. It’s called Install OS X Mountain Lion.app and it should have been downloaded to your main Applications folder (/Applications).
  2. Right-click (or Control+click) the installer, and choose Show Package Contents from the resulting contextual menu.
  3. In the folder that appears, open Contents, then open Shared Support; you’ll see a disk image file called InstallESD.dmg.
  4. Launch Disk Utility.
  5. Drag the InstallESD.dmg disk image into the bottom (empty area) of Disk Utility’s sidebar (on the left).
  6. In Disk Utility, select InstallESD.dmg in the sidebar, and then click the Open button in the toolbar to mount the disk image’s volume in the Finder. The mounted volume is called Mac OS X Install ESD, and it also appears below InstallESD.dmg in Disk Utility.
  7. Select Mac OS X Install ESD in Disk Utility’s sidebar, then click the Restore button in the main part of the window.
  8. Drag the Mac OS X Install ESD icon into the Source field on the right (if it isn’t already there).
  9. Connect to your Mac the properly formatted hard drive or flash drive you want to use for your bootable Mountain Lion installer.
  10. In Disk Utility, find this destination drive in the left-hand sidebar and then drag it into the Destination field on the right. (If the destination drive has multiple partitions, just drag the partition you want to use as your bootable installer volume.) Warning: The next step will erase the destination drive or partition, so make sure it doesn’t contain any valuable data.
  11. Click Restore, and then Erase in the dialog box that appears; if prompted, enter an admin-level username and password.

Dual-layer DVD option:


With Mountain Lion's InstallESD.dmg file mentioned above in step 3, copy the dmg to your Desktop. Now, we're ready to burn a bootable DVD of the installer.
  1. Insert a blank DVD into your Mac's optical drive.
  2. If a notice asks you what to do with the blank DVD, click the Ignore button. If your Mac is set up to automatically launch a DVD-related application when you insert a DVD, quit that application.

  3. Launch Disk Utility, located at /Applications/Utilities.

  4. Click the Burn icon, located in the top right corner of the Disk Utility window.

  5. Select the InstallESD.dmg file you copied to the Desktop in an earlier step.

  6. Click the Burn button.

  7. Place a blank DVD into your Mac's optical drive and click the Burn button again.

  8. A bootable DVD containing OS X Mountain Lion will be created.

  9. When the burn process is complete, eject the DVD, add a label, and store the DVD in a safe location.

To use the media to do a fresh install of Mountain Lion follow these steps:

1.  Back up your Mac, e.g., TimeMachine backup, and disconnect backup from computer, and put the backup in a safe place.
2.  Insert the media with the Mountain Lion copy into your Mac.
3.  Shut down your Mac.
4.  When starting the Mac, press and hold down the appropriate key:
4a)  for booting from DVD drive: press and hold down "C" button on Mac keyboard just after pressing the power. Once you notice the Mac is using the media, you can release the "C" key
or
4b) for booting from USB port: press and hold down "Option" button on Mac keyboard just after pressing the power. Once you notice the Mac is using the media, you can release the "Option" key


(If you need more detailed guides to do this media installation refer to  http://macs.about.com/od/macoperatingsystems/ss/Create-Bootable-Copies-Of-The-Os-X-Mountain-Lion-Installer.htm )


Friday, September 21, 2012

Flowing Fix: Creating Animated GIFs


Sometimes you might need to have an animation in a PowerPoint presentation and the standard animation controls are not quite what you need. Consider creating you our custom animated GIF.

Multiplatform:
http://www.onyxbits.de/giftedmotion


Photoscape (portable on Windows)

Friday, July 27, 2012

Fixing Files Corrupted By FTP

If you've used FTP at a low level, you'll know that you need to transfer files in ASCII or BINARY mode depending on the content of the file.  (For example, a movie file is BINARY and a text document is ASCII.)  I've been backing up a server with FTP.  I forgot to set the BINARY mode on the archives that are transferred and they were corrupted as a result.  Fortunately a command-line program exists that will fix this problem: fixgzip.   It can be downloaded here:

http://www.gzip.org/fixgz.zip

Sunday, July 15, 2012

iBackup: backup select files and folders

iBackup (Mac OS X only) http://www.grapefruit.ch/iBackup/downloads.html
Although Mac OS X has Time machine for general computer backups, sometimes you just want to select certain file and folder to backup to another location.

Saturday, June 30, 2012

Oops, I didn't save my Excel or Word file

On Windows:
Ever forget to save an Excel file, exit Excel, and then press "No" to the Save prompt?  Here's what you can do to recover your file if that happens (this is for Office 2010).

Open Excel, go to File, then click on Options.  Click on the Save section, and find the AutoRecover file location and copy it (this method will only work if you have the "Keep the last autosaved version if I close without saving" option checked).  Open Windows Explorer, paste that in.  Any autosaved versions of your file will be listed there.

On Mac:
(via http://www.dummies.com/how-to/content/recovering-autorecover-files-in-word-for-mac-2011.html )

Recovering AutoRecover Files in Word for Mac 2011

If your power goes out or your computer malfunctions when working on an Word for Mac 2011 document, all you have to do is open the application again. Word 2011 for Mac looks for and opens any AutoRecover files for the document(s) that you were working on when an unexpected crash occurred. Your document opens with “Recovered” appended to the filename. Choose File→Save As from the menu bar to restore the original filename and location.
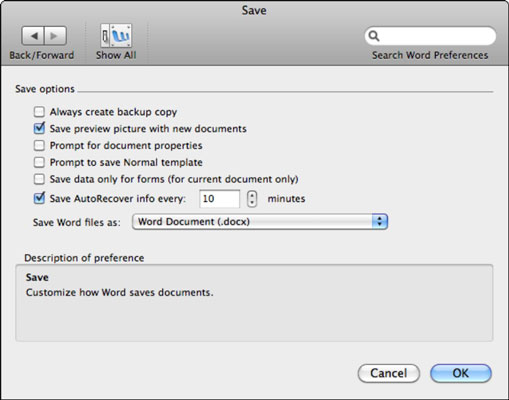
Word for Mac can recover files that were open because, by default, Word autosaves your document every ten minutes while you’re working on it. If you want, you can change the save time interval within the AutoRecover setting as follows:
  1. Choose Word→Preferences→Save from the menu bar.
    Word’s Save preferences are displayed.
    image0.jpg
  2. Change the number of minutes in the Save AutoRecover Info Every: [X] Minutes setting.
    The default is 10 minutes. Entering a lower number saves more often, but you may notice Word is more sluggish when it saves so often. Entering a higher number may make Word perform better, but you may lose more changes if a power outage or computer crash occurs.
    You can deselect this check box if you don’t want Word to save an AutoRecover file. You might do this for extremely large documents that take a long time to save. Of course, if you experience a power outage or computer crash, you will lose all your changes since the last time you manually saved the file.
    You don’t need to select the Always Create Backup Copy check box. With AutoRecover and Time Machine, the bases are covered. The option is there only for backward compatibility.
  3. Click OK when you're finished.
Rarely, Word might not automatically display the AutoRecover file for the document(s) you were working on the next time you open Word. In that case, do the following in Word to open the AutoRecover file:
  1. Choose File→Open from the menu bar.
  2. Type AutoRecover or type a keyword or phrase in the Spotlight Search box in the top-right corner of the Open dialog.
  3. Double-click the most recently saved AutoRecover file, or select the file and click Open. If you did a keyword or phrase search, use the Last Opened information to help you choose a likely file to open.
    If the file you want is grayed-out, choose All Files in the Enable pop-up menu, which allows you to open any file type.
You can also use Mac OS X Time Machine to recover any file that you’ve saved at least once. When you use Word for Mac, it’s nearly impossible to lose more than a few minutes’ worth of work thanks to AutoRecover and Time Machine.

Friday, June 1, 2012

Google SketchUp

SketchUp: (http://sketchup.google.com/)
A powerful and easy to use program to create 3D models. You can also import them to Google Earth


Friday, May 25, 2012

Flowing Fix: Capture your signature using OS X Lion's Preview app

via Mac 101: Capture your signature using OS X Lion's Preview app:


OS X Lion has made signing PDFs easier than ever before. It's been possible to scan in your handwritten signature and sign documents in earlier versions of Mac OS X, but it was a complex process and one most people probably never trifled with. More often than not, I found it easier to simply print out the document, sign it the normal way, and scan the whole document back into Preview using my flatbed scanner.


Lion's version of Preview comes with a built-in signature scanner that makes signing documents far simpler. In the Annotations toolbar you now have an option to create a signature from your Mac's built-in iSight camera. All you need to do is use black ink to sign a piece of white paper, align your signature toward the camera using the onscreen guides, and take a snapshot of the signature. (I haven't used my real signature here, obviously.)


Preview can store multiple signatures, so if you need to both sign and initial documents, you're able to do so easily using Preview's annotation functions. It's a great feature, and one that ensures my printer will be gathering even more dust than it already has.


[Just to be clear, this process only applies a graphical representation of your signature; it does not cryptographically 'sign' the PDF document to ensure that it has remained unmodified. Adobe's Acrobat application can sign PDFs with both a graphic and a digital signature; NitroPDF also has this feature, as does the DocQ web service. The DocuSign web service provides 'electronic signatures,' which are not exactly the same thing either. -Ed.]


One step closer to a truly paperless office
Source | Permalink | Email this | Comments

Friday, May 18, 2012

Picasa by Google

Picasa: (http://picasa.google.com/ )
Organize, edit, and share your photos.  Many powerful features like face detection, GPS tagging, Google Earth connectivity, and more.

Additional resource to learn how to use it

Friday, May 11, 2012

Including pages from PDF documents in a LaTeX documents

via http://texblog.org/: Including pages from PDF documentsBy tom

The package pdfpages let’s you include a complete PDF or any combination of pages into a LaTeX document.

First load the package in the preamble.
\usepackage{pdfpages}

Now use any of the possible options below to include pages from a PDF.

Include the first page
\includepdf{file}

The whole document
\includepdf[pages=-]{file}

A forward or backward range
\includepdf[pages=2-8]{file}
\includepdf[pages=8-2]{file}
\includepdf[pages=last-1]{file}

You never know when that may come in handy. However, the keyword last actually can be quite useful in case the number of pages in the document may change.

Several single pages with/without blanks
\includepdf[pages={3, 6, 1}]{file}
\includepdf[pages={3, {}, 9}]{file}

Copies of the same page
\includepdf[pages={5, 5, 5}]{file}

And finally, a bit of everything
\includepdf[pages={3-6, {}, 1, 7}]{file}

The package also provides the option nup=axb to print several logical pages on a single physical page (the parameter a being the number of columns and b the number of rows). LaTeX scales the logical pages to fit within the margin of the physical page. In the example below the first 4 logical pages will be placed on the first physical page and the rest on the next.

\includepdf[nup=2x2, pages=1-7]{file}

Pdfpages package documentation.


Friday, May 4, 2012

Flowing Fix: How to create custom animations for PPT presentations

Powerpoint can handle gif images which allows for the image to animate without using the action settings within Powerpoint. Animate your logo or other graphic to make an aesthetic impact on your audience. 

Applications to create gifs:
Photoscape (MS Windows): http://www.photoscape.org/
GIFfun (Mac OS X): http://www.stone.com/GIFfun/

Note: Use Gimp and/or Inkscape to help edit images prior to sequencing with the above applications

Friday, April 27, 2012

GIMP: GNU Image Manipulation Program

Though GIMP is often well known; it is worth mentioning because despite its steep learning curve, its capabilities are impressive and extremely useful.
http://www.gimp.org/

Friday, April 13, 2012

iPackr Previews and Unzips Archives on OS X [File Compression]

iPackr Previews and Unzips Archives on OS X [File Compression]:
Mac only: iPackr is a free Mac app that, unlike many other unarchivers for OS X, gives you the option to preview and manually extract the files in an archive. More »


Friday, April 6, 2012

Screen Image Capture Software

MS Windows:
GreenShot:  http://getgreenshot.org/
Screenshot Captor:  http://www.donationcoder.com/Software/Mouser/screenshotcaptor/index.html
EasyCapture:  http://www.xydownload.com/easycapture/index.html
Screenpresso Free: http://www.screenpresso.com/  (feature rich)
PicPik (free for non-commercial use):  http://www.picpick.org/download

others:
Zscreen: http://code.google.com/p/zscreen/
Faststone capture v5.3 (note newer versions are not freeware): http://www.portablefreeware.com/?id=775 or here http://www.aplusfreeware.com/categories/mmedia/FastStoneCapture.html

Mac OS X, iOS, and Android:
Skitch: http://skitch.com/

Chrome Browser (All platforms):
ScreenCapture: https://chrome.google.com/webstore/detail/cpngackimfmofbokmjmljamhdncknpmg
allows capture of entire webpage


For other screen shot capturing informatio see link to the Tip A Day by GeekBeat.TV video click below:
How to Capture Any Screen - GeekBeat.TV: We're introducing a new feature here at Geek Beat - Tip A Day. To start off, we'll show you how to do a screen capture on any device.

Friday, January 20, 2012

Flowing Fix: How to easily determine the LaTeX code for a symbol

Every have trouble remember the code to a LaTeX symbol?

Typically when you want to find an infrequently used symbol in LaTeX you often have to refer to the comprehensive symbols list: http://ctan.math.utah.edu/ctan/tex-archive/info/symbols/comprehensive/symbols-letter.pdf. However, this can be time consuming and difficult to find the symbol you need.

Detexify can help find the code to LaTeX symbols simply by drawing what they look like.  Try it out for yourself, and you will shortly have a new bookmark for Detexify in your browser.

Detexify - LaTeX symbol classifier website
http://detexify.kirelabs.org/classify.html

There is also versions for mobile devices
iOS: http://itunes.apple.com/us/app/detexify/id328805329?mt=8
Android: https://market.android.com/details?id=coolcherrytrees.software.detexify&hl=en